Data Unit Testing With Great Expectations and Cloud Functions

At AirQo, we collect large amounts of data every day from our low-cost monitors deployed throughout the African continent, with the majority being in Uganda, as well as data from our partners such as Kampala Capital City Authority that are streamed every hour, resulting in the exponential growth of the information we collect.
Ideally, before the data is stored in a data warehouse, it should be quality-checked which can be done through data unit testing.
In the field of data engineering, data unit testing is a relatively new concept in which quality checks are made on the data that is being stored by an organization. Testing can be performed at any stage of the data pipeline or after the data has been stored. The tests help to detect errors such as out-of-range values, missing data, and incorrect data types.
Our goal in this tutorial is to explain how a data unit test can be set up at any stage of the data pipeline. We'll use a Python open-source library known as Great Expectations.
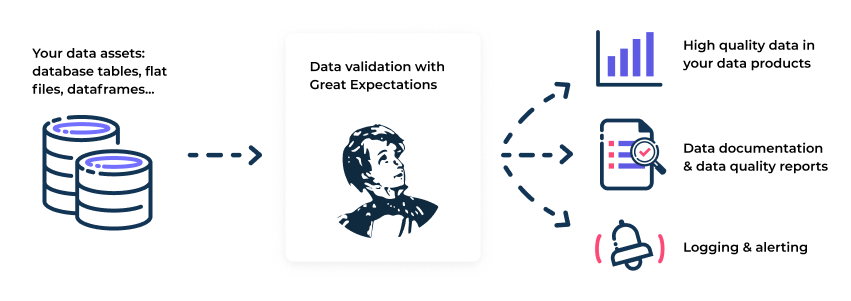
Great Expectations offers pre-written tests called expectations and all one needs is to specify those they’d need and provide parameters to them as we’ll see in this tutorial
It also generates human-readable documentation known as Data Docs that summarise any issues that may have been found in the data.
We’ll also leverage Google Cloud Functions as a trigger for the data tests, and use data captured from the data pipeline
Prerequisites for this tutorial:
2 data buckets in the Google Cloud Project Platform
One for unvalidated data. This will hold data to be validated.
Another for validation results. This will also hold the results from the tests as well as your great_expectations configurations
A machine running
python3locallygcloud SDK installed locally.
We’ll also use a sample dataset from AirQo data but you’re free to use any sample dataset of your choice, as the concept remains the same.
Below is a screenshot of the dataset we’ll be working with.

The task can be broken down into 3 main steps:
Set up Great_expectations and configure it locally.
Upload the configurations to GCP
Create and upload the cloud function to GCP
1. Setting up Great Expectations locally
When working with great_expectations , there are three main concepts that we’ll be working with:
Expectations - These are verifiable assertions about data i.e what we’ll be testing for. These can be saved together in one file known as an Expectation Suite
A Data Context - The primary entry point for a Great Expectations deployment, with configurations and methods for all supporting components.
A Checkpoint - This is the primary means for validating data in a production deployment of Great Expectations.
More concepts are covered in detail on the Great_expectations website. They also offer a great Getting Started Tutorial that I’d recommend you check out to get a quick understanding of the library before we proceed. This tutorial though is for a use case where one has files stored on the Google Cloud Platform, we'll start by configuring our data context locally before uploading it to GCP.
Alright. Shall we continue?
Step 1
Create a new directory on your machine and run the following commands:
$ python3 -m venv venv
$ source venv/bin/activate
This creates the virtual environment within which we’ll be working. Depending on your machine's python installation the first instruction can also be written as follows:
$ python -m venv venv
$ source venv/bin/activate
Step 2
Install great expectations and create a Data Context as well as an expectation suite.
$ python3 -m pip install great_expectations
$ great_expectations –-version
The first line installs great_expectations in our environment and the second is to verify that it’s been installed. You should receive an output from your terminal like this:
> great_expectations, version 0.15.34
Step 3
Initialise and configure the data context first on your local machine, thereafter we shall upload it to GCP.
$ great_expectations init
$ great_expectations suite new
The first line creates the Data Context within which we’ll be working while the second returns a prompt on the options available while creating the expectations. The options include:
Creating the expectations manually without a sample batch of data
Creating the expectations on a sample batch of data to quickly verify your expectations
Automatically using a Data Assistant. Here, the framework automatically analyses your data and creates a few expectations that you can easily configure later.
For this tutorial, we’ll use option 1 as our data is not stored locally but in GCP.
Upon selecting option 1, a Jupyter Notebook is created which you’ll use to create the suite, and requests for a name for your suite, we’ll use airqo_data_tests.
Step 4
Delete the contents of the first cell and replace them with these:
import great_expectations as ge
import great_expectations.jupyter_ux
from great_expectations.core.expectation_configuration import ExpectationConfiguration

context = ge.data_context.DataContext()
suite = context.create_expectation_suite(
expectation_suite_name="airqo_data_tests", overwrite_existing=True
)

print(f'Created ExpectationSuite "{suite.expectation_suite_name}".')
This creates your expectation suite. You may name this expectation suite how you see fit.
Step 5
Create the table and column expectations. These are essentially the tests or validations expected from the data. I’ll use 2 sample ones to give you an overall understanding of how they’re structured. You write the statement below in its Jupyter Notebook cell and save it:
python
expectation_configuration = ExpectationConfiguration(
expectation_type="expect_table_column_count_to_equal",
kwargs={"value": 10},
suite.add_expectation(expectation_configuration=expectation_configuration
)
What this does is create an expectation that states that the table should have the number of columns provided in the kwargs parameter. For this example, we first specify the expectation in the expectation_type parameter and since we expect the table to have 10 columns, we pass the value 10 to kwargs parameter.
All the expectations that you can leverage are listed on the great expectations website, so you can search for those you’d like to use on the site.
Let’s create another expectation, this one for a specific column, and not the entire table. Create a new cell in your notebook and add the following:
expectation_configuration = ExpectationConfiguration(
expectation_type="expect_column_min_to_be_between",
kwargs={
    "column": "latitude",
    "min_value": -90,
    "max_value":90,
},
)
suite.add_expectation(expectation_configuration=expectation_configuration)
Just like the previous one, the structure is similar where one passes the expectation_type and then the kwargs which sets the value in the latitude column. This value should be greater than or equal to -90 and less than or equal to 90
Step 6
After creating your expectations, add a last cell with the following:
with open("../expectations/airqo_data_tests.json", "w") as expectation_store:
import json
json.dump(suite.to_json_dict(), expectation_store)
This last step saves your configurations to a JSON file and builds the Data Docs
Step 7
Next up, we’ll create a directory within the great_expectations directory called loading_args. We’ll save there a file called airqo_data_tests.yaml. (it should have the same name as the expectation suite file).
Here we’ll add some of the arguments we’d like to pass to Pandas pd.read_csv() . This is necessary because Great Expectations uses pandas as its execution engine for these tests. You can find more on this on the official docs.
In the same file, add the following:
reader_options:
 index_col: False
Step 8
We go on to configure the great_expectations.yaml file inside the great_expectations folder. This file is used to set the location of the target data and where one will store other information such as the expectations, the validation results and data docs.
yaml
config_version: 3

datasources:
  my_gcs_datasource:
    class_name: Datasource
    module_name: "great_expectations.datasource"
    execution_engine:
        class_name: PandasExecutionEngine
    data_connectors:
        default_runtime_data_connector_name:
            class_name: RuntimeDataConnector
            batch_identifiers:
                - default_identifier_name

expectations_store_name: expectations_GCS_store
validations_store_name: validations_GCS_store
evaluation_parameter_store_name: "evaluation_parameter_store"

stores:
    expectations_GCS_store:
        class_name: ExpectationsStore
        store_backend:
            class_name: TupleGCSStoreBackend
            project: ${PROJECT}
            bucket: ${VALIDATION_BUCKET}
            prefix: 'expectations'

    validations_GCS_store:
        class_name: ValidationsStore
        store_backend:
            class_name: TupleGCSStoreBackend
            project: ${PROJECT}
            bucket: ${VALIDATION_BUCKET}
            prefix: 'validations'

    evaluation_parameter_store:
      class_name: EvaluationParameterStore

data_docs_sites:
  gs_site:
    class_name: SiteBuilder
    store_backend:
      class_name: TupleGCSStoreBackend
      project: ${PROJECT}
      bucket: ${VALIDATION_BUCKET}
      prefix:
    site_index_builder:
      class_name: DefaultSiteIndexBuilder

validation_operators:
  action_list_operator:
    class_name: ActionListValidationOperator
    action_list:
    - name: store_validation_result
      action:
        class_name: StoreValidationResultAction
    - name: store_evaluation_params
      action:
        class_name: StoreEvaluationParametersAction
    - name: update_data_docs
      action:
        class_name: UpdateDataDocsAction

anonymous_usage_statistics:
  enabled: False
A quick summary of what the code above means:
datasources:
  my_gcs_datasource:
    class_name: Datasource
    module_name: "great_expectations.datasource"
    execution_engine:
        class_name: PandasExecutionEngine
    data_connectors:
        default_runtime_data_connector_name:
            class_name: RuntimeDataConnector
            batch_identifiers:
                - default_identifier_name
This defines where Great Expectations can find the data, and what execution engine to use. It offers Pandas and PySpark
stores:
    expectations_GCS_store:
        class_name: ExpectationsStore
        store_backend:
            class_name: TupleGCSStoreBackend
            project: ${PROJECT}
            bucket: ${VALIDATION_BUCKET}
            prefix: 'expectations'

    validations_GCS_store:
        class_name: ValidationsStore
        store_backend:
            class_name: TupleGCSStoreBackend
            project: ${PROJECT}
            bucket: ${VALIDATION_BUCKET}
            prefix: 'validations'
This defines the VALIDATION BUCKET will hold both our expectations that we define as well as the results of the checks done in a directory called validations
data_docs_sites:
  gs_site:
    class_name: SiteBuilder
    store_backend:
      class_name: TupleGCSStoreBackend
      project: ${PROJECT}
      bucket: ${VALIDATION_BUCKET}
      prefix:
    site_index_builder:
      class_name: DefaultSiteIndexBuilder
This defines where the docs about the data that has been validated are stored.
validation_operators:
  action_list_operator:
    class_name: ActionListValidationOperator
    action_list:
    - name: store_validation_result
      action:
        class_name: StoreValidationResultAction
    - name: store_evaluation_params
      action:
        class_name: StoreEvaluationParametersAction
    - name: update_data_docs
      action:
        class_name: UpdateDataDocsAction
This then tells Great Expectations to store the results, and update the data docs.
2. Uploading Configurations to GCP
The values for $PROJECT and $VALIDATION_BUCKET can be configured as environment variables in one’s terminal. E.g $VALIDATION_BUCKET= “gs://validation_bucket” where PROJECT is the GCP project name, and VALIDATION_BUCKET is a bucket to hold validations, data docs as well as expectations.
NOTE: Ensure to include gs:// before the values.
Finally, as we have gcloud installed, we upload these configurations to GCP, where the tests will be done.
This can be done using this command:
gsutil -m rsync -r -x 'uncommitted/*|.gitignore|plugins/*' great_expectations $VALIDATION_BUCKET
3. Creating Cloud Function and Uploading it to GCP
Next up, we’ll write the code for the cloud function. This function will be triggered every time a file in the bucket is created or modified.
First off, we’ll create a cloud_functions folder with a sub_directory called data_validation. Navigate to the data_validation folder
Here, we’ll create 3 files and 1 directory as shown below:
requirements.txt- This holds the required libraries for the cloud function as shown below:
google-cloud-storage
great-expectations==0.15.28
fsspec
gcsfs
env.yaml- This holds the files with the private details about the project, and buckets and is filled as shown below:
PROJECT: <PROJECT_NAME>
BUCKET: <BUCKET_NAME>
VALIDATION_BUCKET: <VALIDATION_BUCKET_NAME>
3. Next up, we’ll create a src directory with an empty __init__.py file, as well as a gcs.py file. Fill the gcs.py file with the following:
import logging
from typing import Any

import ruamel.yaml as yaml
from google.cloud import storage

logger = logging.getLogger(__name__)
logger.setLevel(logging.DEBUG)
ch = logging.StreamHandler()
ch.setLevel(logging.DEBUG)
formatter = logging.Formatter("%(asctime)s - %(name)s - %(levelname)s - %(message)s")
ch.setFormatter(formatter)
logger.addHandler(ch)


def read_yml_from_gcs(
    bucket_name: str,
    blob_name: str,
    template: dict[str, Any],
    client: storage.Client = storage.Client(),
) -> dict[str, Any]:
    bucket: storage.Bucket = client.bucket(bucket_name)
    content: bytes = bucket.blob(blob_name).download_as_string()
    decoded: str = content.decode("utf-8")

    for k, v in template.items():
        decoded = decoded.replace(k, v)

    return yaml.safe_load(decoded)


def move_blob(
    bucket_name: str,
    blob_name: str,
    prefix: str,
    client: storage.Client = storage.Client(),
) -> None:

    bucket = client.bucket(bucket_name)
    blob = bucket.blob(blob_name)

    new_name = "/".join([prefix] + blob_name.split("/")[1:])
    new_blob = bucket.rename_blob(blob, new_name)

    logger.info(f"Blob {blob.name} has been renamed to {new_blob.name}")


def check_trigger_file_path(blob_name: str, trigger_prefix: str) -> bool:
    return blob_name.startswith(trigger_prefix)


def extract_dataset_name(blob_name) -> str:
    return blob_name.split("/")[1]
4. Finally, navigate back to the parent data_validation directory create a main.py file that will be used to trigger the cloud function as shown below:
import logging
import os
from typing import Any, Dict

from great_expectations.checkpoint import SimpleCheckpoint
from great_expectations.checkpoint.types.checkpoint_result import CheckpointResult
from great_expectations.core.batch import RuntimeBatchRequest
from great_expectations.data_context import BaseDataContext
from great_expectations.data_context.types.base import DataContextConfig
from src.gcs import (
    check_trigger_file_path,
    extract_dataset_name,
    move_blob,
    read_yml_from_gcs,
)

logger = logging.getLogger(__name__)
logger.setLevel(logging.DEBUG)
ch = logging.StreamHandler()
ch.setLevel(logging.DEBUG)
formatter = logging.Formatter("%(asctime)s - %(name)s - %(levelname)s - %(message)s")
ch.setFormatter(formatter)
logger.addHandler(ch)

PROJECT = os.environ["PROJECT"]
VALIDATION_BUCKET = os.environ["VALIDATION_BUCKET"]
YAML_TEMPLATE = {"$PROJECT": PROJECT, "$VALIDATION_BUCKET": VALIDATION_BUCKET}


class ValidationError(Exception):
    """Validation Unsuccessful Exception"""


def build_data_context_config(config: dict[str, Any]) -> DataContextConfig:
    return DataContextConfig(**config)


def build_data_context(config: DataContextConfig) -> BaseDataContext:
    return BaseDataContext(config)


def build_batch_request(
    gcs_uri: str, batch_spec_passthrough: dict[str, Any]
) -> RuntimeBatchRequest:

    return RuntimeBatchRequest(
        datasource_name="my_gcs_datasource",
        data_connector_name="default_runtime_data_connector_name",
        data_asset_name=gcs_uri,
        runtime_parameters={"path": gcs_uri},
        batch_identifiers={"default_identifier_name": "default_identifier"},
        batch_spec_passthrough=batch_spec_passthrough,
    )


def build_checkpoint(
    checkpoint_name: str,
    expectation_suite_name: str,
    context: BaseDataContext,
    batch_request: RuntimeBatchRequest,
) -> SimpleCheckpoint:

    file_name = "-".join(batch_request.data_asset_name.split("/")[3:])

    checkpoint_config = {
        "config_version": 1.0,
        "class_name": "Checkpoint",
        "run_name_template": f"%Y%m%d-%H%M%S-{file_name}",
        "validations": [
            {
                "batch_request": batch_request.to_json_dict(),
                "expectation_suite_name": expectation_suite_name,
            },
        ],
    }

    return SimpleCheckpoint(
        name=checkpoint_name, data_context=context, **checkpoint_config
    )


def run_validation(
    dataset_name: str,
    gcs_uri: str,
    project_config: Dict[str, Any],
    batch_spec_passthrough: Dict[str, Any],
) -> CheckpointResult:

    logger.info("Building great expectations configs")

    context_config = build_data_context_config(project_config)
    context = build_data_context(context_config)
    batch_request = build_batch_request(gcs_uri, batch_spec_passthrough)
    checkpoint = build_checkpoint(
        checkpoint_name=dataset_name,
        expectation_suite_name=dataset_name,
        context=context,
        batch_request=batch_request,
    )

    logger.info(f"Starting Validation for {gcs_uri}")
    return checkpoint.run()


def main(data, context):

    if not check_trigger_file_path(data["name"], "landing_zone"):
        return

    dataset_name = extract_dataset_name(data["name"])
    data_uri = f"gs://{data['bucket']}/{data['name']}"
    project_config = read_yml_from_gcs(
        bucket_name=VALIDATION_BUCKET,
        blob_name="great_expectations.yml",
        template=YAML_TEMPLATE,
    )
    batch_spec_passthrough = read_yml_from_gcs(
        bucket_name=VALIDATION_BUCKET,
        blob_name=f"loading_args/{dataset_name}.yml",
        template=YAML_TEMPLATE,
    )

    checkpoint_result = run_validation(
        dataset_name, data_uri, project_config, batch_spec_passthrough
    )

    if checkpoint_result["success"]:
        logger.info("Validation successful")
        move_blob(
            bucket_name=data["bucket"], blob_name=data["name"], prefix="validated"
        )
    else:
        logger.error("Validation unsuccessful")
        raise ValidationError
5. We’re almost there! So we’ll upload the cloud function to Google Cloud. One requires cloud function admin privileges to do this. We can create a bash script named upload.sh to implement this as shown below. I'll add comments to explain each argument's meaning:
##This tutorial uses v1 cloud functions.
gcloud functions deploy  data_unit_test \
    --source cloud_functions/data_validation \ #local path to the cloud function
    --entry-point main \ #main.py file. Runs on function trigger
    --project $PROJECT \ #The GCP project name
    --region europe-west \ #Region where to deploy the function
    --env-vars-file cloud_functions/data_validation/env.yaml \
    --runtime python310 \ #python version
    --memory 512MB \ #how much memory the function is allocated
    --trigger-resource $BUCKET \ # bucket that triggers the function
    --trigger-event google.storage.object.finalize #event that causes func to run
Remember to add your files to be validated in a directory labelled landing_zone and a subdirectory with the same name as your expectation suite. The function will be triggered every time a file is created or an existing one modified. You can add data to the untested data bucket, as a test to trigger the function. To see the status of how the function's running, check the logs of your cloud functions.
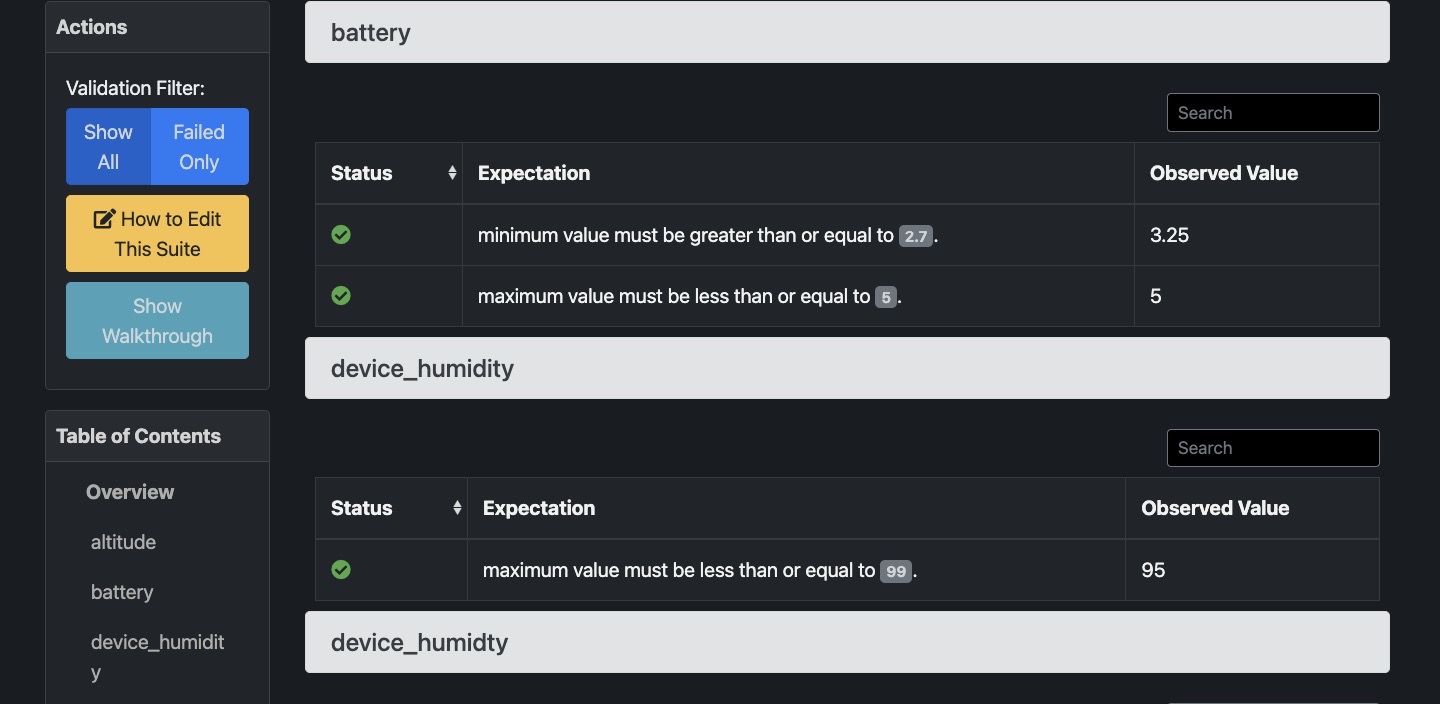
The validated data folder also contains a sub-directory called validations which contains details on the results of a given trigger, these are summarised by great_expectations in an html file or JSON file as shown below:
If you are a developer or a student in need of data for your project, we are your one-stop source of air quality data. Simply click here to register.


